


As an Amazon Associate I earn from qualifying purchases.
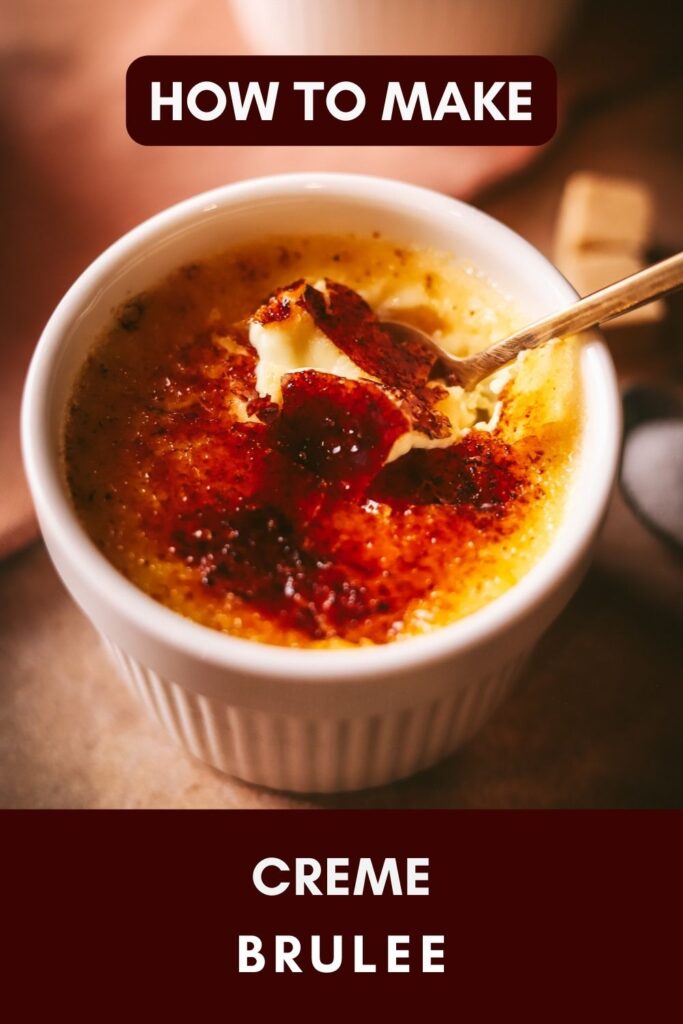
There are very few desserts that make you feel like an absolute culinary genius in your own kitchen, and crème brûlée is at the top of that list. Something about tapping through that crackly sugar crust into a silky, rich custard just feels like magic. And guess what? It’s shockingly simple to make at home - as long as you have a blowtorch handy!

I’ve tested this recipe over and over, tweaking tiny details to make it foolproof, luxurious, and totally restaurant-worthy. This isn’t just a crème brûlée recipe. This is the one.
Why You’ll Love This Recipe
- It’s easier than you think: If you can whisk and bake, you can make crème brûlée.
- Texture perfection: Creamy, dreamy custard with a crisp caramelized sugar topping.
- Minimal ingredients, maximum payoff: Seven simple ingredients create absolute magic.
- Make-ahead friendly: Chill it in the fridge for up to two days before brûléeing.
- Guaranteed showstopper: There’s something so satisfying about torching that sugar topping.
What is Crème Brûlée? Where Did It Come From?
Crème brûlée is basically the fancy cousin of pudding—a rich vanilla custard with a hard, crackly caramelized sugar top. It translates to "burnt cream" in French, which is exactly what you're doing: burning sugar into a crisp shell.
While we usually associate crème brûlée with French cuisine, its exact origins are up for debate. Spain has Crema Catalana, England has Burnt Cream, and versions of this dish have been floating around since the 1600s. But the French get the most credit for popularizing it.

What I Tested and Didn’t Work
To get this recipe just right, I tested a few variations that didn’t make the cut. Here’s what went wrong:
- Using only heavy cream: It was too rich, almost cloying. Cutting it with whole milk makes it smoother, and a bit easier to eat a whole ramekin of. However, if you only have heavy cream, have at it. It's still delicious.
- Baking at 325°F: This temp was too high, causing the edges to overcook before the center set. 300°F was perfect.
- Using boiling water in the water bath: This cooked the sides too fast, making a weird, curdled texture. Hot but not boiling water is the key.
Ingredients (And Why They Work)
- Whole milk (1 cup) – Lightens the custard just enough while keeping it creamy.
- Heavy cream (2 cups) – The main player for that luscious, rich texture.
- Vanilla extract (2 tsp) – Classic and aromatic. Use vanilla bean paste for an extra boost.
- Salt (¼ tsp) – Enhances all the flavors and balances the sweetness.
- Sugar (¾ cup, plus extra for topping) – Sweetens the custard and creates that signature sugar crust.
- Egg yolks (7) – The key to thickening the custard into something silky and decadent.

How to Make Crème Brûlée
Preheat oven to 300°F.
Heat the cream: Warm milk, heavy cream, and salt in a saucepan over medium heat until steaming. Remove from heat, then stir in vanilla.

Whisk yolks & sugar: In a separate bowl, whisk egg yolks and sugar until smooth.


Temper the eggs: Slowly ladle warm cream into the yolks, whisking constantly so they don’t scramble.


Divide among 4–6 ramekins.

Water bath: Place ramekins in a 9x13 baking dish. Pour hot (but not boiling) water (158°F/70°C) into the pan until halfway up the ramekins. I have this nifty creme brulee pan that's super helpful (but not necessary) if you're interested!

Bake: Cook for 30–35 minutes until the edges are set but the center is still jiggly.

Chill: Cool at room temp for 20 minutes, then refrigerate for at least 2 hours.
Brûlée the sugar: Sprinkle 1.5 teaspoon sugar on each custard and torch until deep golden brown. Let sit for 60 seconds before serving. (And if you don't have a torch, time to get one, it's so fun!)


Pro Tips and Tricks
- Use a water bath: This ensures gentle, even cooking and prevents curdling.
- Strain the custard: This removes any bits of cooked egg for a silky-smooth texture.
- Chill thoroughly: Don’t rush this step! The custard needs at least 2 hours to fully set.
- Use a real blowtorch: Kitchen torches work best—broilers can be unpredictable and overheat the custard.
- Don’t brûlée too early: The sugar crust will soften if left for too long. Torch it just before serving!
Easy Variations
Once you nail the classic version, here are some fun twists:
- Chocolate Crème Brûlée – Add 2 oz of melted dark chocolate to the custard before baking.
- Espresso Crème Brûlée – Stir in 1 tablespoon of espresso powder for a coffee-infused version.
- Salted Caramel Crème Brûlée – Swap half the sugar for caramel sauce and add a sprinkle of flaky salt.
- Citrus Crème Brûlée – Add 1 tablespoon of orange or lemon zest for a bright, tangy twist.
Make-Ahead, Storage, and Freezing
- Make-ahead: You can prepare and bake the custards up to two days in advance. Keep them covered in the fridge and brûlée the sugar just before serving.
- Storage: Leftover crème brûlée (if that’s even a thing!) can be stored in the fridge for up to 3 days. The sugar topping may soften, so torch it again if needed.
- Freezing (Not Recommended, But Possible): Freezing will change the custard’s texture, making it grainy. If you must freeze it, do so before brûléeing. Thaw overnight in the fridge and torch the sugar just before serving.
More Amazing Desserts to Try

📖 Recipe

Seriously Good Creme Brulee
Equipment
Ingredients
- 1 C whole milk
- 2 C heavy cream
- 2 teaspoon vanilla extract
- ¼ teaspoon salt
- ¾ C sugar
- 7 egg yolks
Instructions
- Preheat oven: Set to 300°F (150°C).
- Heat the cream: In a saucepan, heat milk, cream, and salt over medium heat until steaming but not boiling. Remove from heat and stir in vanilla.
- Whisk yolks & sugar: In a bowl, whisk egg yolks and sugar together until smooth.
- Temper the eggs: Gradually ladle the warm cream into the egg mixture, whisking constantly.
- Divide among 4–6 ramekins (depending on size).
- Water bath: Place ramekins in a 9x13 baking pan. Add hot water (158°F/70°C) to the pan until it reaches halfway up the ramekins.
- Bake: Bake for 30–35 minutes, until the edges are set but the center is still jiggly.
- Cool & chill: Remove ramekins from the water bath and let cool for 20 minutes, then refrigerate for at least 2 hours.
- Prepare to serve: Take ramekins out of the fridge 30 minutes before serving.
- Torch the top: Sprinkle 1½ teaspoon sugar over each custard. Use a kitchen blowtorch to melt the sugar until deeply golden. Let harden for 60 seconds before serving.
Notes
- Vanilla options: Use high-quality vanilla extract, vanilla bean paste, or scrape a vanilla bean for the best flavor.
- Torch vs. broiler: A kitchen torch gives the most even caramelization. A broiler can work in a pinch but may overheat the custard. You have to watch it LIKE A HAWK.
- Serving temp: Crème brûlée is best served slightly cool—take it out of the fridge 30 minutes before brûléeing.
- Sugar topping: Use superfine sugar for the most even caramelization, but regular granulated sugar works too.
Nutrition

Hi, I'm Cara! I'm a food writer, journalist, and recipe developer. I'm obsessed good food, good wine, good cocktails and entertaining. I've picked up a few tips over the years, and love sharing them with others.
Leave a Reply